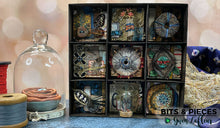
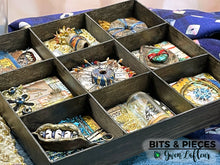
The Process - As artists and crafters, we’re often collectors – we have bits and pieces of this and that stashed throughout our studios or spaces. So why not bring them together to create a curated display case?
We’ll make our own curio boxes (I’ll provide two different patterns) and I’ll also demonstrate several types of handmade embellishments using air-dry clay, stamps, paint, beads, and more.
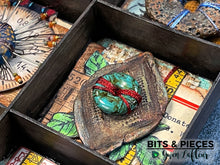
The Results - We’ll combine our handmade embellishments (or pre-made if you prefer) with paper, ephemera, and other supplies to create several small pieces of layered and dimensional artwork, custom-made and then nestled into their own little curio cubbies.
When complete, you’ll have a beautiful and personal display to showcase the Bits & Pieces that represent you and your style.
- you will receive a link to join our private Facebook group.
- Join in, meet, and interact with other students.
- About a week before the official live class there will be a pre-class video to demonstrate creating some of the elements to prepare for your projects. (This will be archived in the group if you can’t join live.)
- The live, 2-1/2 hour class will be taught through a Facebook Live video in our private classroom.
- Work along with Gwen and ask questions via posts and comments.
- 4+ hours of live demos – that’s the equivalent of a full-day in-person workshop, plus the added feedback and community interaction.
- Get downloadable patterns for two sizes/styles of handmade curio boxes.
- Learn how to make your own handmade clay embellishments as “bits” to use in your curio box.
- A coupon for 10% off your order for the Everything Mixed Media online shop (See FAQ for details)
- Videos, questions, comments, and projects are available indefinitely. You can re-watch later – as often as you’d like!
- Share photos of your in-progress and finished projects for feedback from me and other class members.
Tools:
- Scissors
- Optional – Craft knife, ruler, and self-healing mat (if making your own curio box. You could also use scissors.)
- Optional – Rubber stamps (I’ll be using my stamps from PaperArtsy, but you can use any designs or brands you like.)
- Optional – Acrylic stamp blocks if using unmounted stamps
- Optional – stencils (I’ll be using my stencils from StencilGirl, but you can use any designs or brands you like.)
- Optional – Sewing needles if you’re going to stitch. (I will be using an embroidery needle large enough for a size 8 Perle cotton thread.)
- Optional – An awl or something to poke holes for stitching.
- Optional – A stylus/skewer/chopstick (if you’re planning to make your own clay embellishments.)
- Optional – Molds if you want to work with clay but not make embellishments totally from scratch (or they make a great starting point too.)
Adhesives:
- A strong white glue like Tacky Glue or PVA
- Optional – A clear drying glue if you’re going to adhere to beads, Boho Bits, etc… (I like iCraft Ultra Bond Adhesive, E-6000, Helmar, or Beacon 3-in-1.)
- Optional – A glue stick (I love the Coccoina brand or I also use Avery.)
- Optional – A quick-drying super glue like Loctite Gel Control or DAP Rapid Fuse.
Paper, Fabric, & Substrates:
- Illustration board / Canva board/chipboard/cardboard… something 1/16″ to 1/8″ thick and sturdy enough to use to create your curio box. (Equivalent of 2 – 8.5″ x 11″ sheets.)
- You can also use a pre-made curio box or skip the box altogether if desired.
- A selection of pieces and/or scraps of paper
- I recommend some thicker plain papers as well as patterned papers, collage or gelli print, etc…
- Optional – a few pieces/scraps of fabric
-
Optional – bits and pieces of ephemera
- I’ll be using several labels, tickets, and other ephemera stamped with my PaperArtsy stamps (sets EGL17, EGL19, and EGL21.)
Inks, Paints, Pens, etc…:
- A few colors of acrylic paint (I used PaperArtsy French Roast, Pistachio, Caramel, Twilight, Nougat, Little Black Dress, and Autumn Fire as well as Golden High Flow Shading Gray and Iridescent Bronze in my sample.)
- Optional – Ink pads (I’ll be using Jet Black, Sepia, and a few other colors of Archival Inks.)
- Optional – A few colors of spray inks (I’ll be using Tim Holtz Distress Stain and Distress Oxide sprays.)
- Optional – Metallic wax to accent your pieces.
Embellishments:
(I’ve listed everything as optional; pick and choose based on what you want to use to customize your projects. You do not need them all… you can also feel free to incorporate items that are not on this list.)
- Optional – An air dry or epoxy clay (paper clay, Crayola Model Magic, Amaco or DAS clays, Aves Apoxie… any will work *if* you want to make your own clay embellishments.)
-
Optional – Various sizes and shapes of beads (I love disc beads for this type of work. I’ll also demonstrate making a few types of clay beads.)
- You may want a few seed beads on hand if you want to make the spiked beads like in my sample. I used mainly size 11/0.
- Optional – headpins or sewing pins and/or a T-pin or memo pin.
- Optional – Ribbon, sari yarn, threads (I used several metallic threads,) trims
- Optional – Charms, bits and broken pieces of jewelry, buttons, coins, metal findings, jewels/rhinestones, Boho Bits, Prills, etc…
- Optional – Premade paper/flat embellishments (I used some Tim Holtz collage bits and transparent butterflies.)
- Optional – a mini bell jar or a mini apothecary bottle (the Tim Holtz one is taller and will fit in the 2nd curio box pattern I’ll provide.)
Miscellaneous:
- Baby wipes
- Paper towels


